Ethereum is a type of blockchain application that has become a foundational pillar of new internet application ecosystems. You might have heard of these ecosystems by another name: web3.
I've spent the past few years building distributed systems with Kubernetes, one of the most popular and widely used application orchestrators, and I wanted to see what it would look like if I tried to run my own private ethereum blockchain on a Kubernetes cluster.
In this post, I'll walk you through how I built my own ethereum cluster and will share links to the helm chart/ kubernetes manifests I used to build this ethereum cluster.
A very important disclaimer; this content is by no means financial advice and makes no suggestion to invest, purchase, or buy any cryptocurrency or make any monetary investment of any kind. Please do your own due dilligence before running blockchain applications as some cloud providers may not allow it. This post does not suggest that the reader use any public cloud provider for such applications.
⛵️ Kubernetes Cluster Specs
I'm using a three node kubernetes cluster, version 1.20, with debian based OS (Ubuntu1804 will do). Each node has 2CPU and 4GiB RAM.
I've provisioned this cluster with k0s it's a pretty cool and lightweight kubernetes distribution that can run on most linux distributions. I'm also using docker as my CRI, old-school I know, so I had to follow this custom CRI setup.
🚀 Deploying Ethereum
You can find the helm chart I used on my GitHub profile; anthonycorletti/ethereum-on-kubernetes.
Let's take a look at each component and how they all fit together.
🗺 Chart Topology
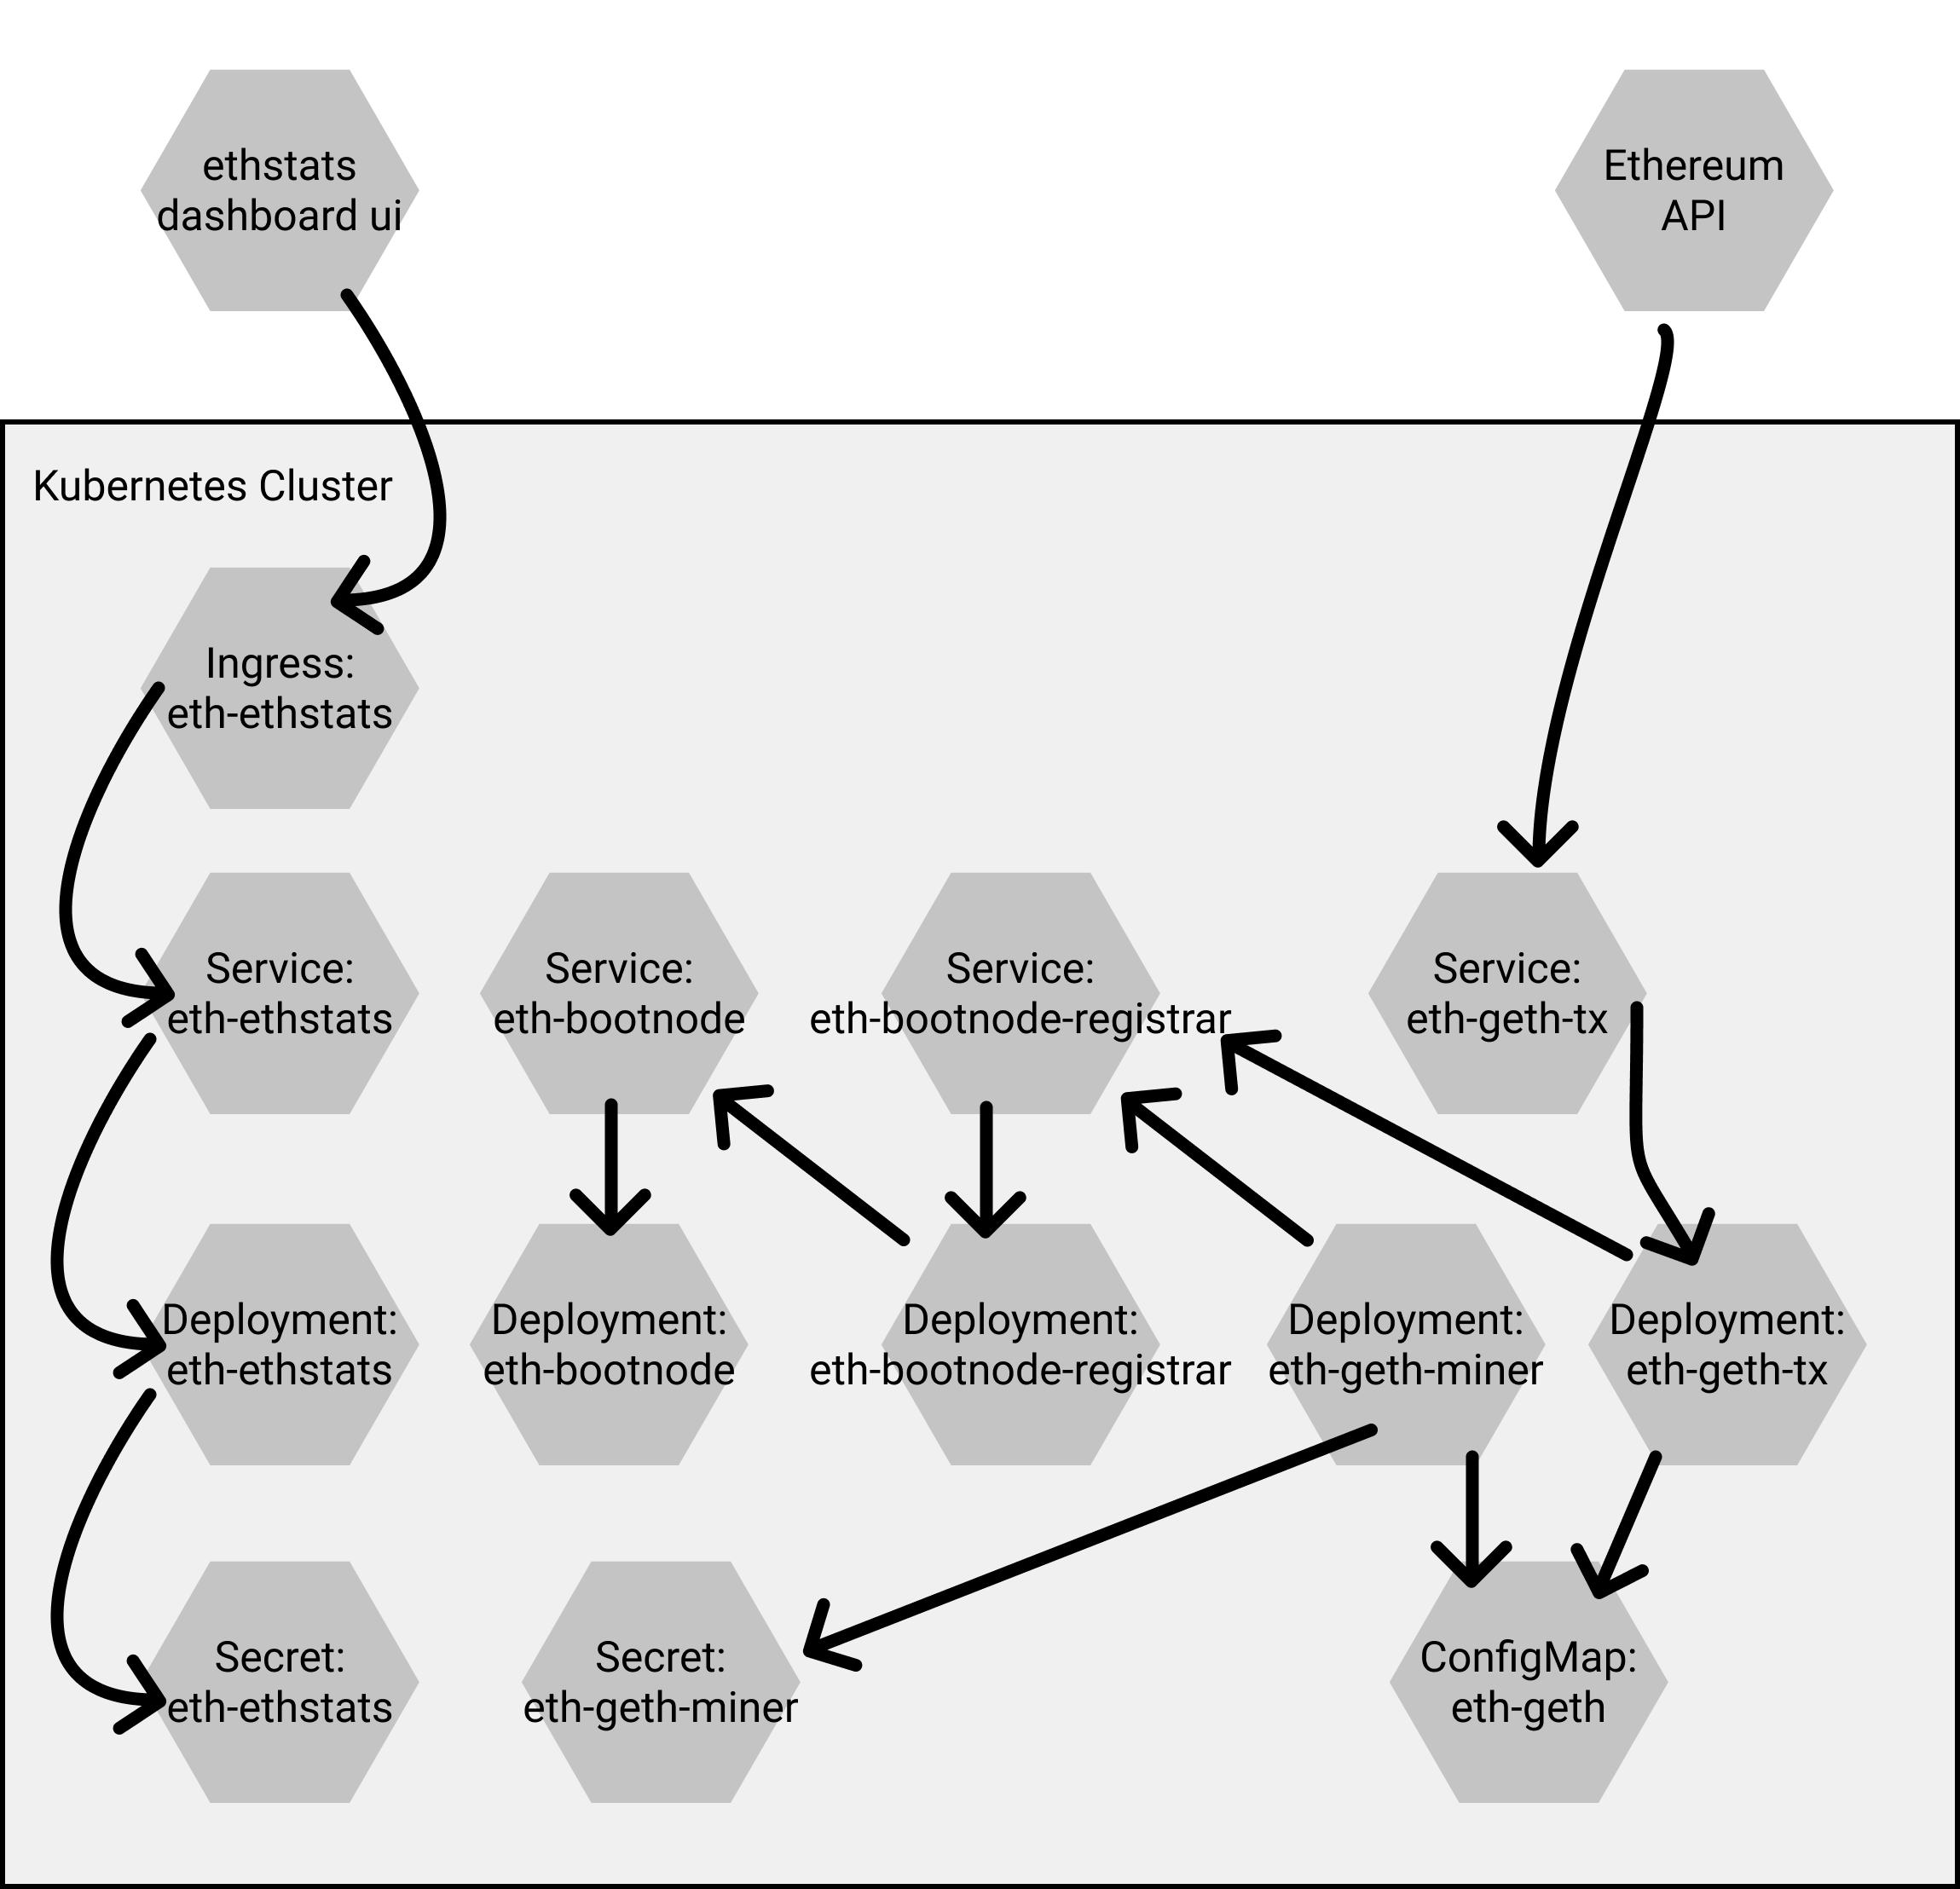
🎿 Bootnode
Bootnode Service & Deployment
A bootnode is a stripped down version of our Ethereum client implementation that only takes part in the network node discovery protocol. Bootnode does not run any of the higher level application protocols. It can be used as a lightweight bootstrap node to aid in finding peers in private networks.
The Bootnode Service provides the endpoints eth-bootnode:30301 and eth-bootnode:8080 to each Pod with the selector eth-bootnode.
Bootnode pods use the official ethereum/client-go Docker container, in this case, version alltools-release-1.8. Bootnode pods start with an initialization container named genkey. The genkey init container runs the command bootnode --genkey=/etc/bootnode/node.key.
The bootnode asks for a key. Each ethereum node, including a bootnode, is identified by an enode identifier. These identifiers are derived from a key. Therefore you will need to give the bootnode such key. Since we currently don’t have one, we can instruct the bootnode to generate a key (and store it in a file) before it starts.
Once the genkey initContainer has completed, the bootnode pod runs two containers, bootnode on port 30301/UDP, and bootnode-server; a simple command-line web server that responds on port 8080/TCP with the Ethereum node address.
Bootnode Registrar Service & Deployment
bootnode-registrar is a registrar for Geth Bootnodes. bootnode-registrar resolves a DNS address record to enode addresses that can then be consumed by geth –bootnodes=..
Later on in this configuration, the miner and tx pods initialize by calling the eth-bootnode-registrar:80 service to receive a comma-separated list of bootnodes as an Ethereum node address.
The Bootnode Registrar Deployment uses the bootnode-registrar container. bootnode-registrar is open source and you can quickly build a custom container with the provided Dockerfile. In this configuration, we use the pre-built container provided.
If you are using a custom namespace be sure to change the BOOTNODE_SERVICE environment variable to the namespace you are using.
The bootnode-registrar Pod runs a single Docker container named bootnode-registrar, running the jpoon/bootnode-registrar:v1.0.0 image from Docker hub.
📊 Ethstats Dashboard
Deployment & Service
The eth-netstats project provides an awesome dashboard interface for monitoring Ethereum nodes.
eth-netstats consumes stats provided by the Ethereum geth nodes. Geth is the command line interface for running a full Ethereum node implemented in Go and is deployed with miner and tx (transaction) components.
You will need to create a secret for the ethstats dashboard deployment. You can do this by running (this may or may not work depending on your OS);
LC_ALL=C tr -dc 'A-Za-z0-9' </dev/urandom | head -c 17; echo -n
There are hardcoded secrets in the values.yaml of our chart for you to use for testing purposes.
The Ethstats dashboard Deployment uses the Docker container ethereumex/eth-stats-dashboard from Ethereum Expertise. The container uses the environment variable WS_SECRET to set the password the Ethereum nodes use in calling to report their stats.
💻 Geth
Geth is the command line interface for running a full ethereum node implemented in Go. Geth is used to mine ethereum, transfer funds between addresses, create contracts and send transactions, explore block history and many other operations.
The following configurations use Geth to initialize the new private blockchain, configure miners and operate transaction only nodes.
Ethereum Genesis Block
Read Explaining the Genesis Block in Ethereum for a better understanding of the Ethereum Genesis Block.
Geth nodes initialize themselves and start the new private blockchain with the first block (Ethereum Genesis Block) defined in the key genesis.json.
You should customize the value networkid in the ConfigMap and the “chainId” in the genesis.json. Ethereum nodes must have the same genesis block and networkid to join a network. Large network ids typically indicate private networks.
ConfigMap
The Geth miner and transaction (tx) pods mount the Geth ConfigMap.
Along with customizing the networkid/chainId, you may also add Ethereum accounts to fund when the Genesis Block gets created. These can be any addresses you like. Use MetaMask or Rainbow to manage your accounts from a mobile device or install Geth on your local workstation – type geth account new to create a new account.
This private network has a limited number of miners running with restricted CPU access, so we want to keep the overhead low for this exercise.
Read the official documentation on private networks configuration for more details on choosing a network id and creating the Genesis Block.
Geth Miner Nodes
The following configuration deploys three Geth miner nodes that share a Secret used for creating their coinbase accounts (no it doesn't have anything to do with the company, Coinbase).
Geth Miner Node Secret
A Kubernetes Secret is used to store a common password each miner uses for creating an Ethereum account funded by block creation rewards; this is called the coinbase.
This password is used to unlock the associated Ethereum account to transfer ethereum gained from the miner nodes to other accounts. However, the coinbase may be configured for each miner can at any time.
Geth Miner Node Deployment
This configuration starts with three miner Pods but can easily be scaled. Pods consist of one main container named geth-miner and two initialization containers named init-genesis and eth-geth-miner.
The pods request a minimum CPU allotment of 0.5 cores and maximum of 1.
Geth Transaction Nodes (tx)
Geth Transaction Nodes eth-geth-tx are only used to create transactions on the private blockchain.
Geth Transaction Nodes Service
Access to Geth Transaction Nodes is through a Service named eth-geth-tx on ports 8545 and 8546.
Geth Transaction Nodes Deployment
Issuing transactions on the private Blockchain occur through a set of two Geth Transaction Nodes; these Pods are setup similar to miners running the official ethereum/client-go:release-1.8. Geth Transaction Node consist of one main container named geth-tx and two initialization containers init-genesis and get-bootnodes.
🚀 Deploying
Checkout the deployment script in the repo.
🎁 Conclusion
You're all set! You should be able to port forward to the ethstats dashboard and see something like the dashboard below.
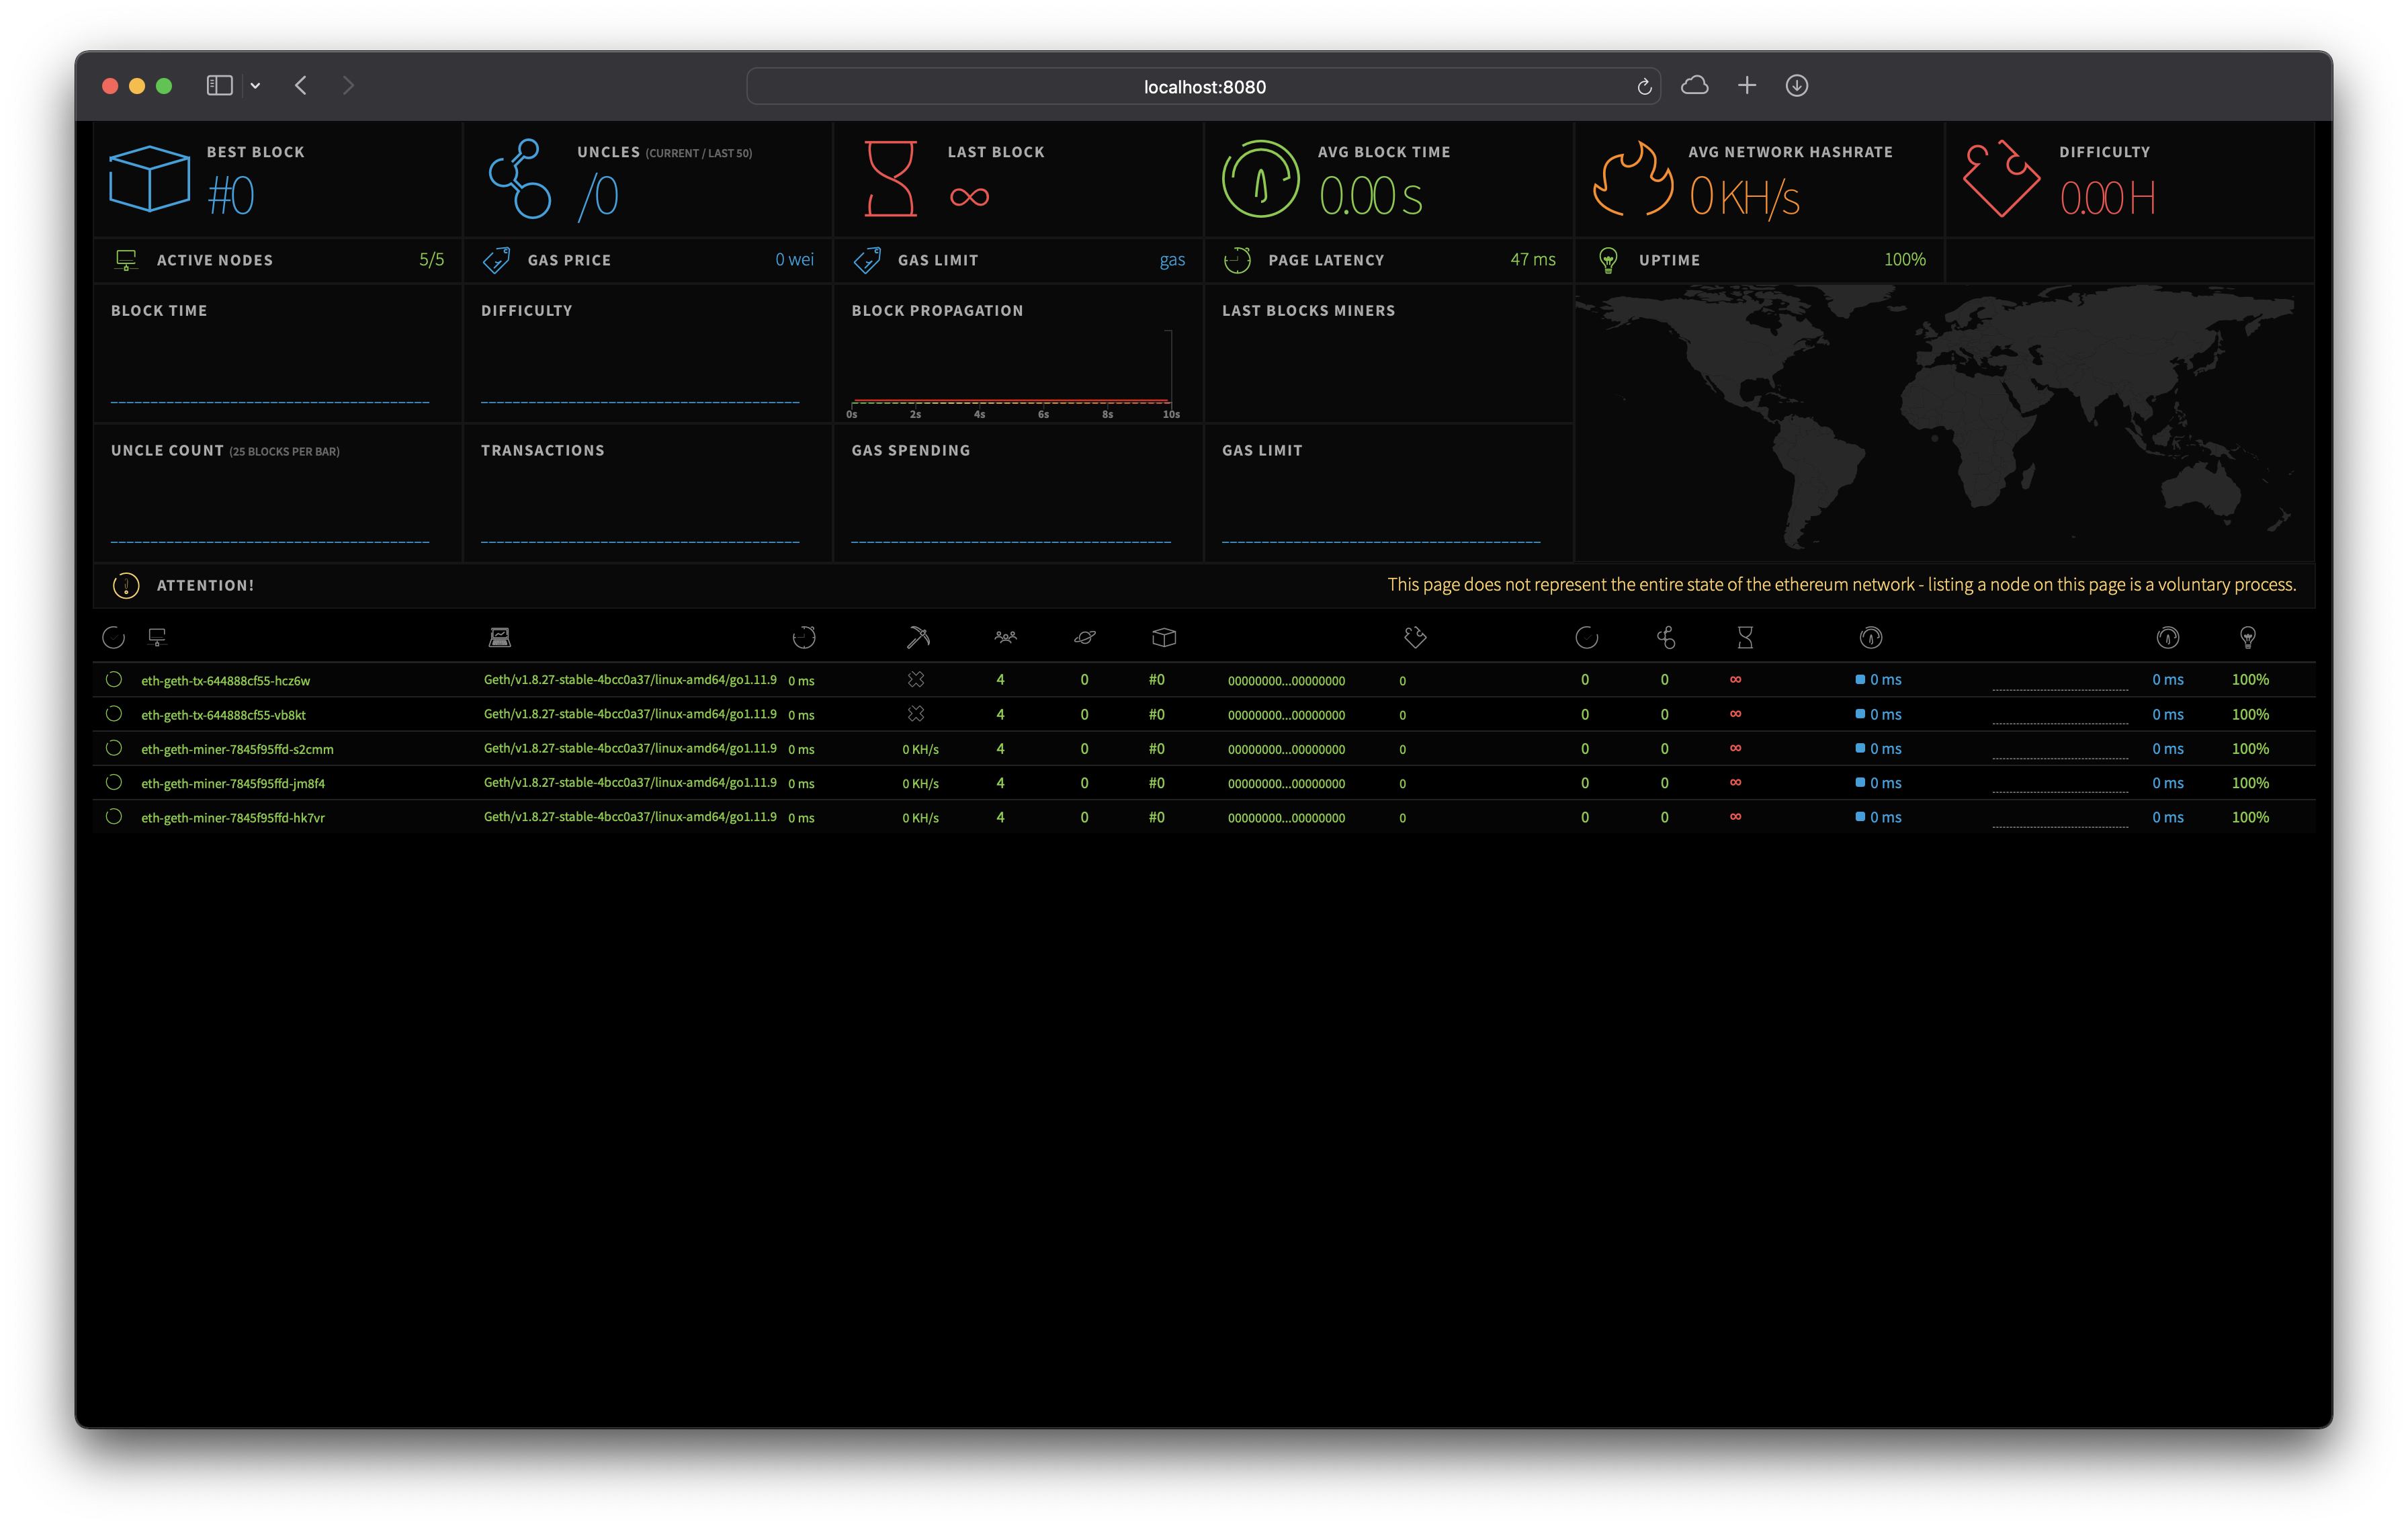
If you followed along correctly, depending on your resources, it may take 10-20 minutes to mine the first block of your private chain!
In order to do this you will have to expose your transation nodes to the internet and add a custom RPC service to your Metamask or whatever wallet youre using to connect with. Make sure to also specify the correct chain ID (as referenced in the genesis.json located in the geth configmap definition).
However, the mining difficulty is automatically adjusted over time, so you may begin to mine blocks at around 20-30 seconds on average.